
How To Appliqué Wool Felt - Blanket Stitch - Beginner Lesson 3
/
Welcome!
Before you begin we recommend the following:
Sewing With Wool Felt - A Beginner's Guide To Blanket Stitch
How To Cut Perfect Shapes Out Of Wool Felt - A Tutorial
How To Appliqué Wool Felt - Blanket Stitch - Beginner Lesson 1
How To Appliqué Wool Felt - Blanket Stitch - Beginner Lesson 2
In this lesson you will learn:
How to start and end your stitching when you don't need to go all the way around. One shape of felt is going to overlay the other on your background. I will talk about positioning the second shape and appliqué it all the way around as previously learned. We presume that the back side of your fabric will ultimately not be visible.
Let's get started!
Supplies Needed
Pattern - for two felt shapes, one to overlay the other
Wool Felt - enough to accommodate your pattern pieces and a background
Freezer Paper and a Pencil
Embroidery Floss or Perle Cotton
Embroidery Needle, Scissors, Pins
Scotch Tape - optional
Step 1 - Prepare Your Project
Your shapes can be any design you want. Draw, trace, iron and cut them out. Position and secure shape #1 to your background for stitching.
NOTE: Most felt appliqué patterns will come with a placement diagram telling you how to lay your pieces on top of each other. Position all of your pieces before you start stitching and make sure they line up correctly and fit on your background the way they should. Then set aside those you're not working with, appliquéing them in sequence to your background.

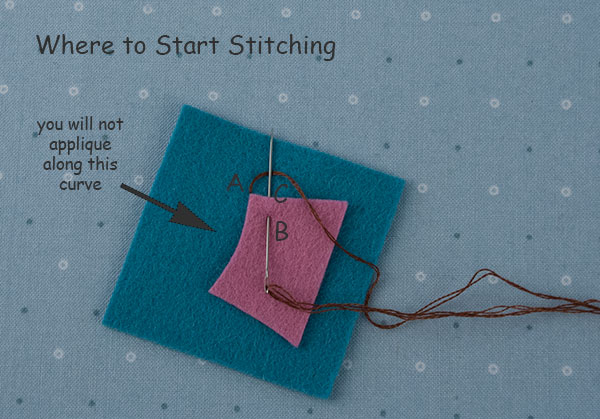
Step 2 - Where to Start Stitching
When you're not going all the way around, you want to start your stitching at the very end of shape #1, along your first edge. This ensures there will be thread "framing" the edge of your piece. Bring your needle up from the back side of your background fabric at A and pull it all the way through until your knot catches. Be careful not to catch your felt shape because you want the frame thread to lie straight against the edge of your piece. Shape #2 will overlay shape #1 and hold it securely.
Take your first B/C stitch. Unlike in Lesson 1 and 2, when you were going all the way around, you are actually going to keep the tension on this first stitch snug against your felt. This stitch should not be loose because you will not be coming back to it.
Step 3 - Appliqué All the Way Around
Stitch shape #1 to your background all the way around until you are one stitch away from the end on the other side, remembering that you don't appliqué where shape #2 is going to overlay.
Step 4 - Finishing The Last Stitch
When you have taken your last B/C stitch, do not insert your thread at B. Instead, put your needle down at the end of your shape edge as shown and knot it off on the back. Don't pull too tightly. You now have a nice thread framing your work at each end.

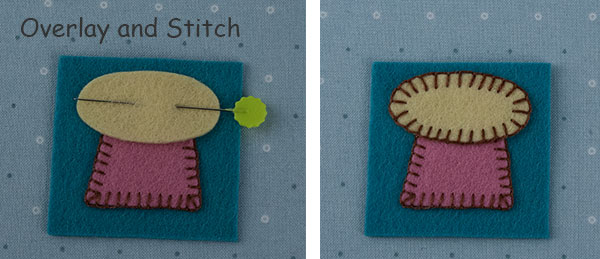
Step 5 - Overlay Shape #2 and Stitch
Next, lay shape #2 on top of shape #1, positioning it to overlap the unstitched edge of shape #1. You want it to overlap about 3/16", depending on what size your stitches are. When you go down at B, you'd like to be at the edge of shape #1. (It's okay if you stitch into #1 when you are going down at B.) When you come up at C, you want to be sure you have grabbed enough of shape #1 so your unfinished edge is never exposed. Try to position shape #2 equidistant from the stitches on each side of shape #1.
Stitch all the way around shape #2 and finish with your knot on the back.
And your done! Now you have a moon, a square and a . . . toadstool???
What's Next?
How To Sew Wool Felt Together - Blanket Stitch - Beginner Lesson 4
