
How To Applique Wool Felt - Blanket Stitch - Beginner Lesson 1
/
Welcome!
Before you begin, we recommend the following:
Sewing With Wool Felt - A Beginner's Guide To Blanket Stitch
How To Cut Perfect Shapes Out Of Wool Felt - A Tutorial
In this lesson you will learn:
How to appliqué a curved shape to your background, from beginning to end, using the blanket stitch. I am using a circle and am going to stitch all the way around. We presume that the back side of your background piece will ultimately not be visible.
Let's get started!
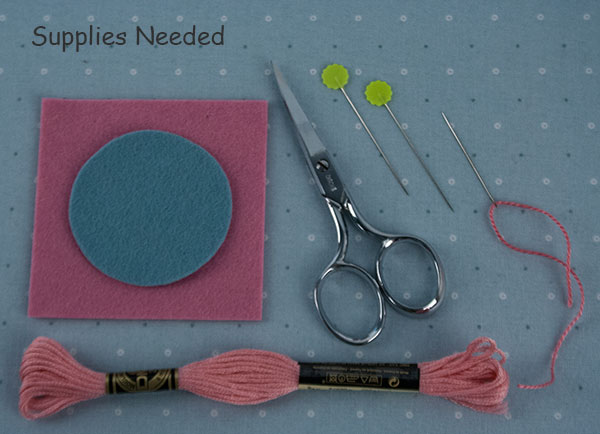
Supplies Needed
Circle of felt approximately 2" in diameter
Square of felt approximately 3" for the background
Embroidery floss or perle cotton
Embroidery needle, scissors and pins
Scotch tape (optional)
Step 1 - Position And Secure Your Circle
Position your circle in the middle of your square and secure it in place. You may pin it if you'd like. I actually use a small piece of Scotch tape to hold mine down as I work, moving it as needed. Once I have the first few stitches in place, it pretty much holds itself. I don't like to use pins for small appliqué work because my thread gets caught on them and they can distort the position of my shape. .
You want your shape to lie as flat as possible on it's background when stitching. If you do want to pin, and many people do, slide your pin through your top layer and the middle of your backing, keeping the pieces as flat together as possible.

Step 2 - Measure and Thread
For blanket stitch appliqué, you need a length of thread approximately four times longer than the area you are going to stitch. "Measure" the circumference of your circle and cut your thread five times longer for this lesson. Every now and then you will want, or need, to remove a stitch. You have to unthread your needle to do this. Rethreading usually requires cutting a bit of thread off for a new sharp edge to fit through the eye of the needle. In Lesson 2, I'll show you what to do if you run out of thread before you finish.
Cut your length of thread as measured above, thread your needle and tie a single loop knot at one end.

Step 3 - Using Your Mind's Eye
Okay. Here is what I don't want you to do but I'm going to show you how anyway, in a photo.
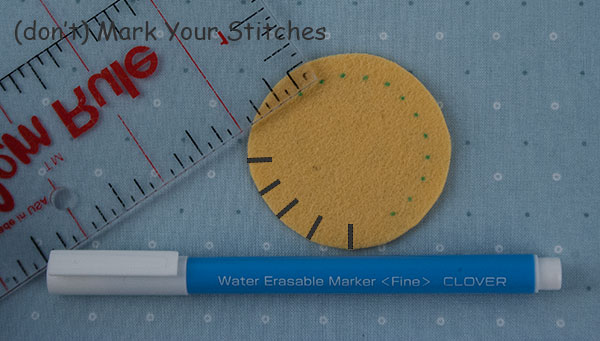
You can find tutorials online that suggest you mark stitch dots on your felt with a non-permanent marker, enabling you to make uniform stitches. This is okay if you want your stitches to be INSANELY PERFECT with no practice. It's also okay if you're really having difficulty with consistent stitch length and you never plan to do anything with the piece your working on. Despite what you may read, it is difficult to remove "washable" markings from wool felt. This marking method can also be useful if you are teaching a young child to sew. I prefer, however, that you develop your mind's eye from the beginning. This is, after all, hand made.
You see in the photo below that I have marked little stitch dots approximately 1/4" in from the edge of my felt circle and not quite 1/4" away from each other. With a circle, if they were the same distance from each other, forming a 1/4" square, your stitches would be begin to slant as you went around. You want your stitch lines pointing from the outer edge to an imaginary dot in the middle of your circle.
You can also see that i have "drawn" some stitch lines. These are not anywhere near perfect because my Photoshop skills lag behind my sewing expertise. But you get the idea. What I want you to do is imagine an inner circle and stitch along it, the same distance from the edge, all the way around. Your stitches will become consistent the more you sew and you will learn to adjust them based on the shape you are stitching, following its movement. Just always imagine the same shape inside the one you're sewing, but a bit smaller.
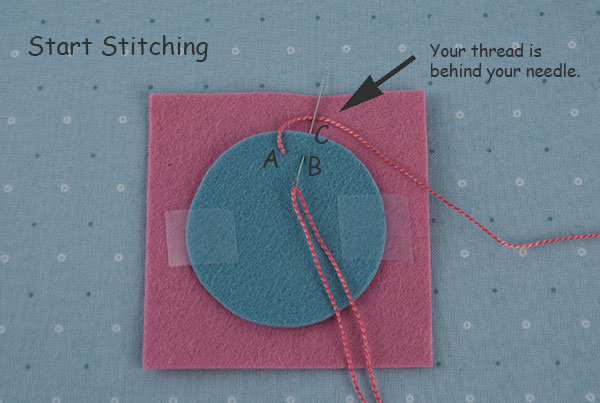
Step 4 - Start Stitching!
Decide where you want to start. Anywhere is fine because you are going to stitch all the way around the circle. I work from left to right because I hold my work in my left hand and stitch with my right. This way I can see where I'm going!
Bring your needle upward from the back of your background fabric, through both pieces of felt, at point A. This is a VERY IMPORTANT first stitch! It will define the distance all of your stitches should be from the edge of your circle. Insertion point B, below, will define how far apart your stitches will be from each other on the "inner" circle. It may take you several pokes from underneath to get point A just where you want it but you only have to do it once!
Pull your thread all the way through until your knot catches the felt on the back. Bring your framing thread across to the right, just above your circle as shown. I hold mine here with my left thumb as I work. Insert your needle down at B, catching your background fabric underneath. Try to put your needle into the felt at a right angle, going straight downward, or outward, depending on how you are holding your work. Catch the background fabric and bring your needle up at C, right at the edge of your circle. Do not catch the circle in your stitch. Keep your needle in front of your framing thread as you come up.
Pull your needle away from your circle, all the way through until the thread behind your needle is lying right up against the edge of your circle. This is your framing thread; it "frames" the edge of your piece. Do not pull too tightly on this first stitch.
The tension of this very first stitch will be different than that of every subsequent stitch. Leave the thread a bit loose like the photo on the left. You will loop through this later, on your last stitch, and pull it snug then. The photo on the right shows it pulled too tightly.
Step 5 - Continue Stitching
When you take your second stitch and as you continue, you want to adjust the tension of your stitches. Pull your thread more snugly against your circle and it's edge. Not so tightly that it dents your felt and not loose like the first stitch. You want it to be just right, lying right on top of your felt.
Continue stitching around your circle, down at B, up at C. Remember to go down into the "imaginary dot" of the inner circle, equidistant from the previous insertion as well as the edge. Try to make your stitches point from the outer edge to the center of your circle. Come up at C as close to the edge of your circle as you can without catching it.
Keep going. B/C B/C BC Almost all the way around. Have fun!

NOTE You may be wondering about the back. How you "rock" your needle in and out of your felt will determine the size and uniformity of your stitches on the back. As your stitches become consistent on the front and you develop a rhythm for B/C, the stitches on the back will become consistent as well.
Step 6 - Approaching the Finish Line
As you approach your original starting point, you want to gauge the placement of your last few stitches, keeping them as consistent with the others around your circle as possible. There is no magic formula for this (unless you decided to measure and mark-up your felt with little dots). This, too, will come with practice. It's that "mind's eye" thing again.
I'm going to add two more stitches. The loose loop created by my first stitch a while ago is going to become my very last in Step 7.

Step 7 - Finishing
After you have emerged for the final time at C and would be ready to dip again at B, instead, insert your needle from right to left under the loose loop of your first stitch.
Pull it gently toward the edge of your circle, forming the last stitch. Insert your needle from the front, at circle's edge, just at the top point of this last stitch. Pull it all the way through to the back and knot it securely. Weave your thread just a bit through the center of your background felt and clip.

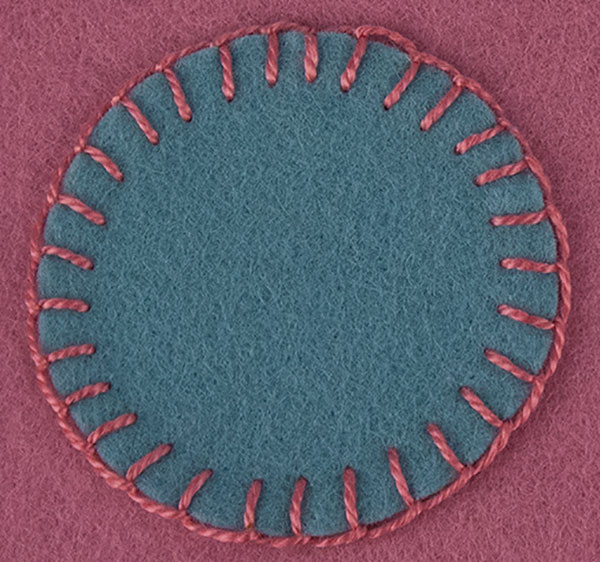
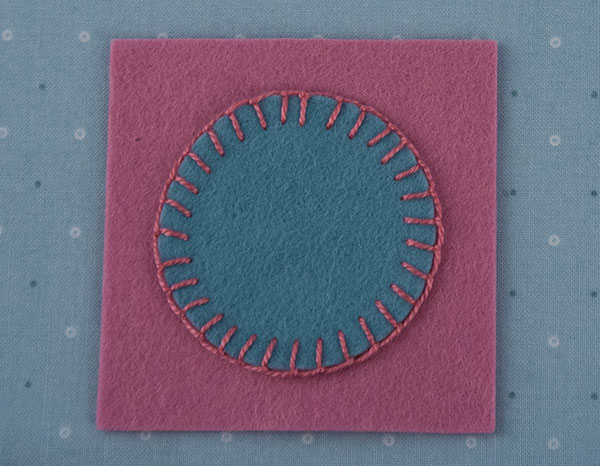
Ta-da! You now have a full blue moon in a pink sky :)
What's Next?
How To Appliqué Wool Felt - Blanket Stitch - Beginner Lesson 2
