
How To Appliqué Wool Felt - Blanket Stitch - Beginner Lesson 2
/
Welcome!
Before you begin, we recommend the following;
Sewing With Wool Felt - A Beginner's Guide To Blanket Stitch
How To Cut Perfect Shapes Out Of Wool Felt - A Tutorial
How To Applique Wool Felt - Blanket Stitch - Beginner Lesson 1
In this lesson, you will learn:
How to go around a corner when appliquéing wool felt using the blanket stitch. I will also show you what to do if you run out of thread before you are finished or if you want to change colors. I am using a square and will appliqué all the way around, presuming that the back of your background fabric will ultimately not be visible.
Let's get started!
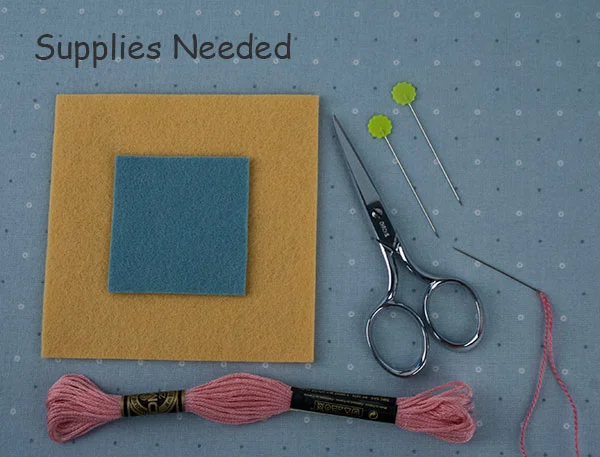
Supplies Needed
Square of felt approximately 2"
Larger square of felt approximately 3" for the background
Embroidery floss or perle cotton
Embroidery needle, scissors and pins
Scotch tape (optional)
Step 1 - Cut & Secure Your Shape/Thread Your Needle
Cut out your felt shape and secure it to your background.
Measure a length of thread needed to go all the way around (4-5 times the distance) and then CUT IT IN HALF. I want it to be too short because you will learn what to do if you run out before you have finished stitching.
Step 2 - Using Your Mind's Eye
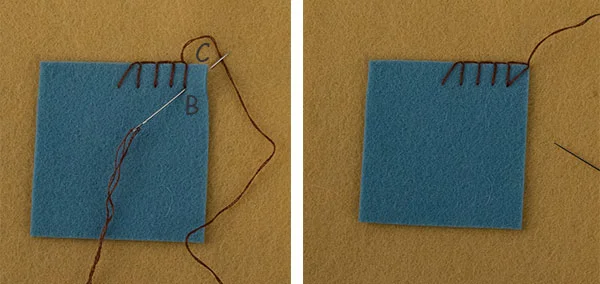
In Lesson 1, I talked about your "mind's eye" and developing a rhythm for symmetrical stitching. Here is a photo showing how your stitches will go around a corner. I have not put dots on it but rather just the exaggerated stitching lines.
You will form a little square when you go around your corners, inserting your needle at B three different times to do so.

Step 3 - Start Stitching
Unlike a circle, I like to start a square in the middle of one side. This helps me to gauge my stitches and the corners.
Bring your needle up at A from behind both pieces of fabric and take your B/C stitch, defining the distance your stitches will be from the edge with B. Come up at C just at the edge of your square, careful not to catch the square itself. Keep your needle in front of your framing thread as you come up at C.
Remember that the tension of this first stitch is going to remain loose and become your last stitch when you get all the way around.

Step 4 - Continue Stitching and The Corner
Continue stitching, B/C, B/C. As you approach the corner, gauge the distance between your stitches and adjust them slightly as needed. Keep in mind you are going to form a little square at the corner. Take a normal stitch, B/C, at the end of your working edge.
Then, for the corner stitch, you are going to re-enter B (from your last stitch) and come out at the point of the corner for C. Keep your needle in front of your thread and pull outward away from the point as shown.
To finish your corner, turn your work around to the next side and enter your needle at the diagonal B for the third time. Come up at C as you normally do along your new edge.
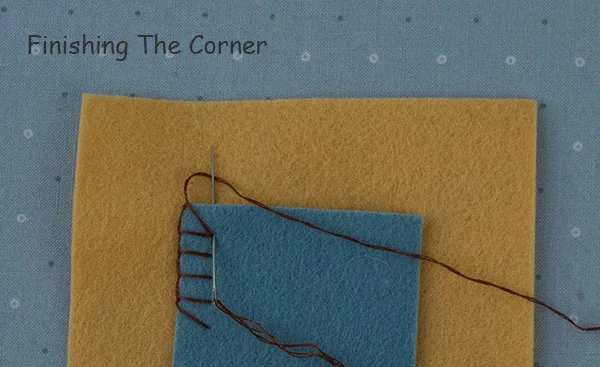
And there you have a beautiful corner! The diagonal stitch may want to shift one way or another and not stay directly on the point. You will be tempted to pull it tight to prevent this. Don't. Try and keep it lying flat and snug. You can shift it with your needle when you are all finished. I will show you how to tie knots at the corner as you work in the advanced beginner lessons. It is not always necessary.
Keep on stitching around the next two corners and then I want you to run out of thread!
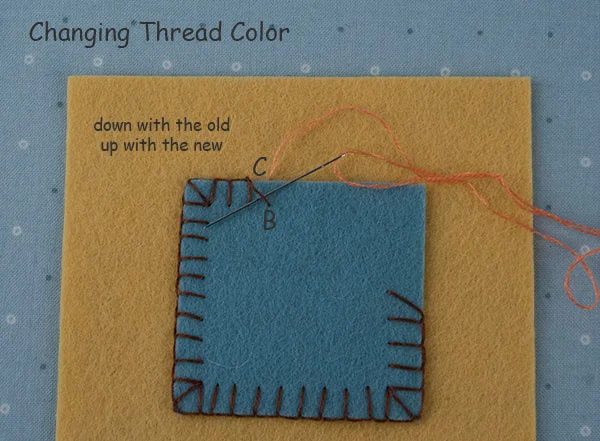
Step 5 - Changing Thread Mid-Stream
When you are near the end of your thread, insert your needle at B but do not come up at C this time. Knot your thread on the back of your background fabric, leaving the stitch loose. You are going to grab that loose stitch with new thread!

Re-thread your needle with the other half of your length of thread. Or, change colors if you'd like. I switched to peach. Bring your needle up from the back of your background fabric where C would have been had you finished that last stitch. Remember not to catch your square. Now, insert your needle under the loose stitch as shown and pull your thread all the way through, up/out toward the edge of your square.
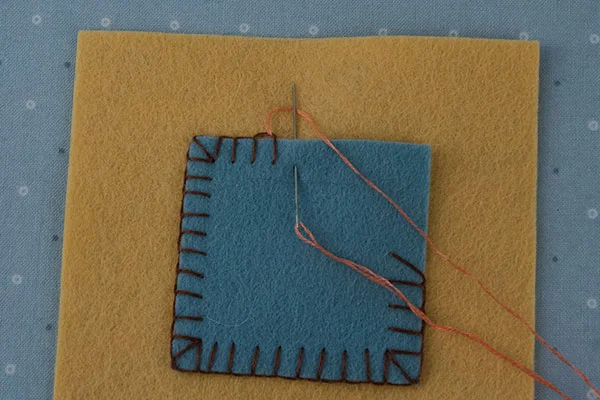
And keep going until you reach the finish line.
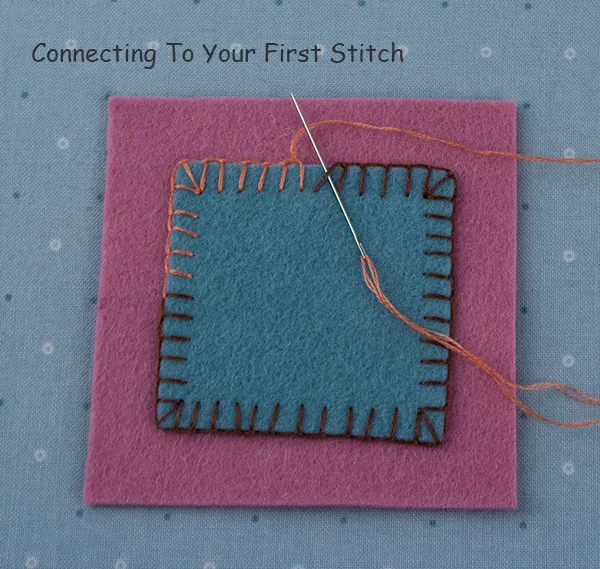
Step 6 - The Finish Line
Remember to gauge your stitches as you approach your starting point. After you have taken your last full stitch, bring your needle under your "loose first stitch" as shown and pull your thread all the way through, in front of the loop coming from your last stitch.
Insert your needle at the top of what was your loose stitch, careful not to catch your square. Pull it all the way through to the back and knot it off.
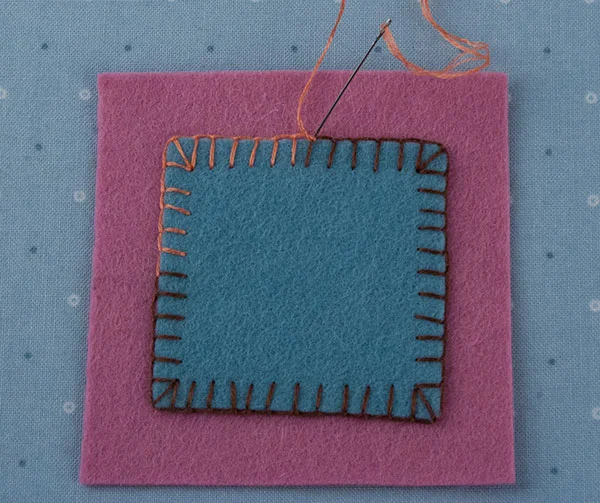
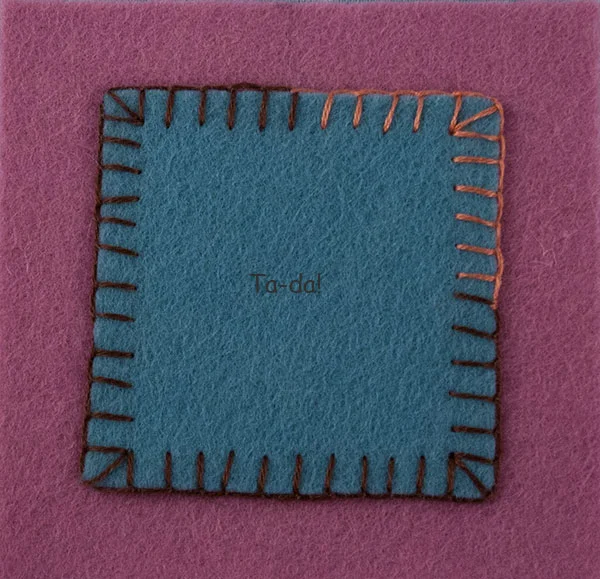
And you're finished!
What's Next?
How To Appliqué Wool Felt - Blanket Stitch - Beginner Lesson 3
