
Wool Felt Applique Project Tutorial - Spring Flower Door Pocket
/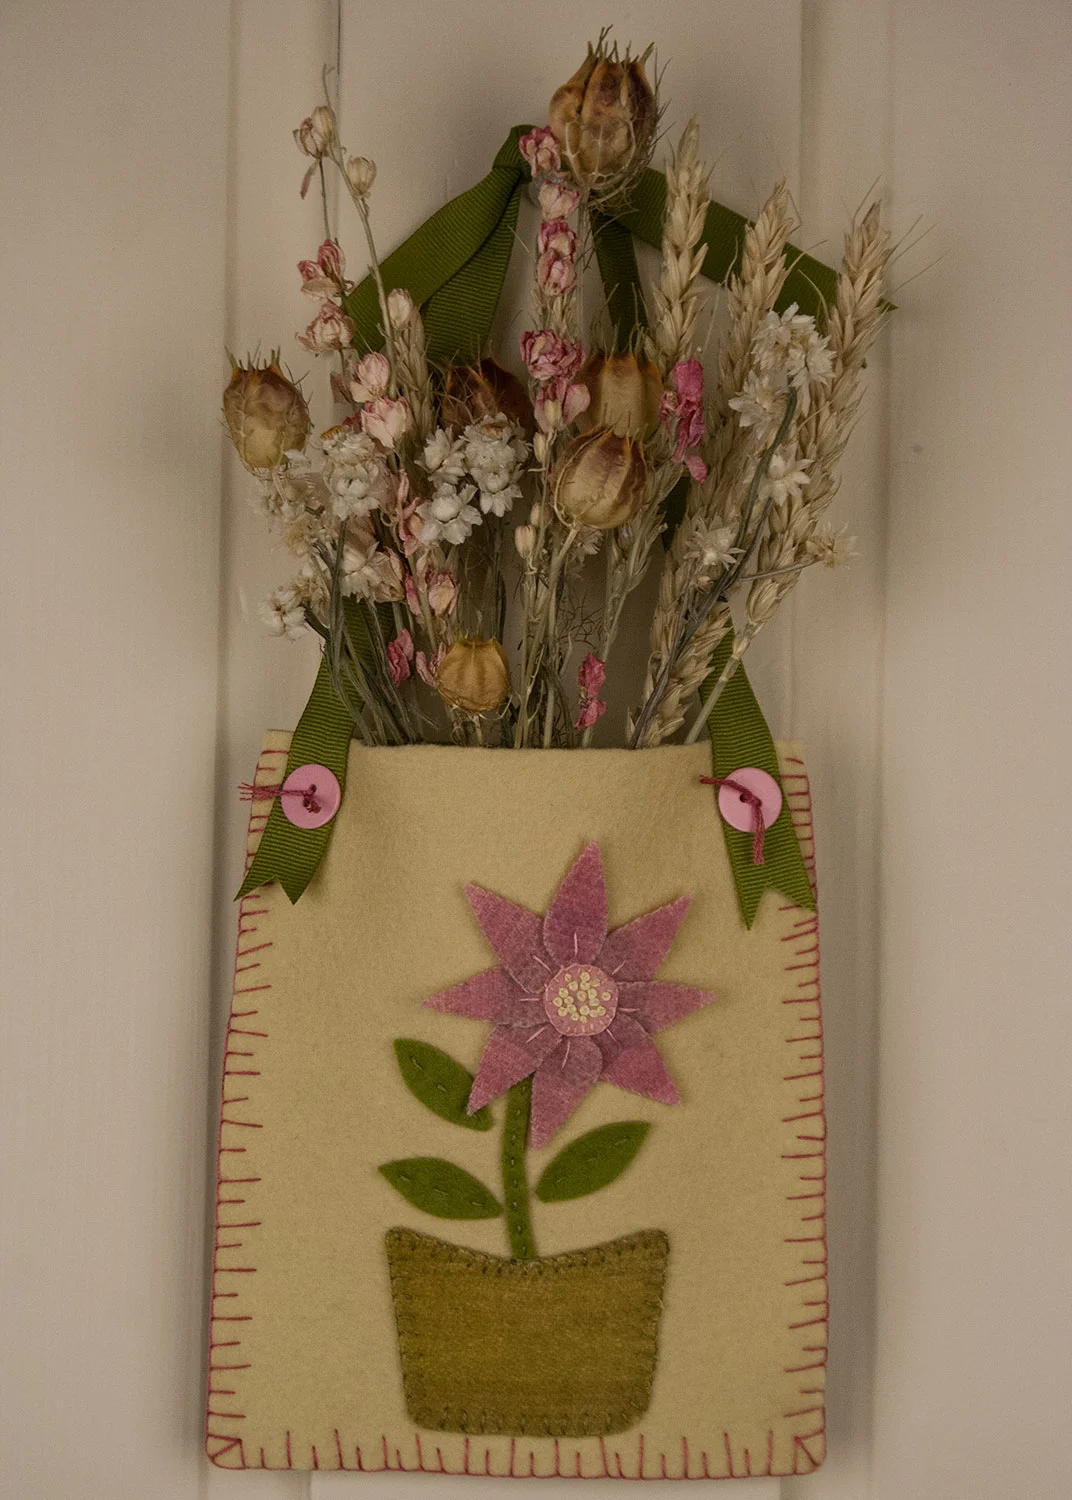
Despite the fact that it snowed yesterday and the March wind is howling here in Maine, spring is coming! Cozy in my studio, I put together this DIY home dec project for you to make. It is suitable for all skill levels and perfect for the beginner just learning to work with wool felt appliqué. Entirely hand-sewn and simply embroidered, we will use the blanket stitch, straight stitch, running stitch and French knots. No sewing machine required! Makes a lovely gift for Easter or Mother's Day.
Helpful Tutorials for this Project on my BLOG
How To Cut Perfect Shapes Out of Wool Felt
Wool Felt Lesson Series
Materials you will need:
• wool or wool blend felt
• front & back - 5.5" x 6.5"
• flower pot - 2.25" x 3"
• flower petals - 1.5" x 4.5"
• flower center - 1" scrap of contrasting color
• stem & leaves - 3/16" x 3" strip & 2" x 1.5"
• coordinating embroidery floss
• two buttons
• two 12" pieces of ribbon
• freezer paper (for cutting your felt using this method)
• dried flowers or fresh sprigs of baby's breath
Tools you will need:
• embroidery needle, a few pins, sharp scissors, a pencil and scotch tape
• iron (used for the freezer paper method of cutting your felt pieces
Project Notes
• For my sample I used felted wool for my flower petals and the flower pot. "Felted wool" is different from "wool felt" and can fray slightly on the edges if it is not stitched. (You can see most clearly in the photo for STEP 5.) I'm in the process of writing a great post explaining the difference between these two textiles and happened to have some beautiful felted wool I wanted to use. All other pieces of my pocket are wool felt. Either works great for this project as it won't be played with!
• I used a size 7 embroidery needle and two strands of floss knotted at one end.
• I like to use scotch tape to hold my felt pieces to the background while I stitch. In many instances it works better than pins. It doesn't get in my way, won't affect the felt and is easy to move as you stitch.
Let's get started!
STEP 1 - Using the freezer paper method and pattern template here, trace, iron and cut everything out.
STEP 2 - Center Mark, Stem & Flower Pot
• On the pocket front, mark a dot 2 1/8" from the top and 3 1/8" from the left side. This will be the flower center and will not be seen later.
• Position the flower pot 3/8" from the bottom of the front, centered left to right. Pin to hold in place.
• Place one end of the stem right at the dot, curve it slightly and tuck the other end underneath the pot. Depending on the degree of your curve, you may want to trim off the bottom end of the stem. You want about 1/4" tucked under the flower pot. Scotch tape the stem in place.
• Secure the stem to the front with the running stitch. Sew right up the middle of the stem, removing the tape as your stitches hold it in place.
• Applique your flower pot to the front with the blanket stitch. Make sure at least one stitch grabs the stem.
STEP 3 - Position & Tape Flower Petals
• Lay four flower petals around the "dot" with the curve inward and the points facing out as shown. Tape the outside points to the pocket front to hold them in place.
• Lay the remaining four petals on top of the first, centered between them as shown. Tape these outer points down as well.
• Lift the curved edge of the bottom petals up over the top ones to create a "pinwheel" effect. Your petals should be close to the center dot, fanning around it.
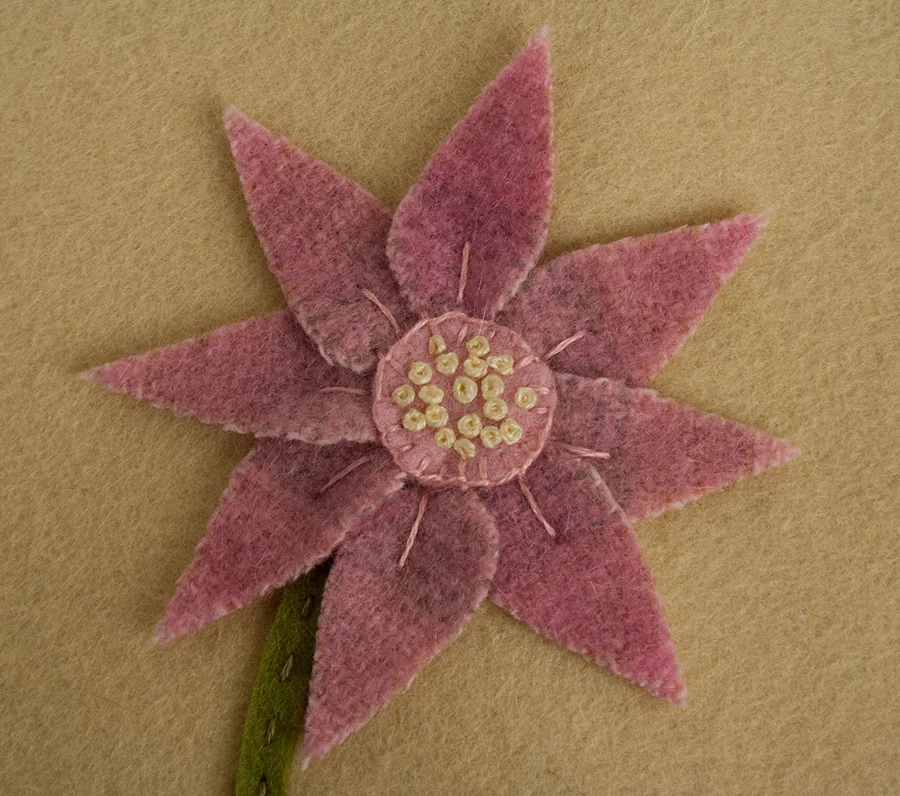
STEP 4 - Applique Flower Center
• Pin the flower center over the middle of your petals.
• Applique the center to your petals with the blanket stitch.
• Take a simple straight stitch approximately 1/4" long from the edge of the center toward the point of each petal.
This is the most difficult step of this project. Take your time. Check that your petal curves are tucked under the flower center and catch them as you sew. Make sure your stitches go all the way through to the back (of the front pocket piece) as you work. This will ensure your flower is secure.
STEP 5 - Add some French knots to the center!
STEP 6 - Leaves
• Position the leaves, two on the left and one on the right as shown. Tape or pin in place.
• Sew them to the pocket front with the running stitch right up the middle.
STEP 7 - Stitch Front to Back
I had fun with this part! I used pink accent floss to pick up my flower color and alternated my stitch length. You can do this or keep your stitches all the same size. This pocket will not be stuffed so your stitches can be large and varied.
• Pin the pocket front to the back. Make sure your edges are even all the way around.
• Begin at the top of one side and stitch all the way around three edges, leaving the top open.
When using the blanket stitch, a general rule of thumb is to cut your thread 4 times the distance you are stitching. Even though it's easy to stop and start with a fresh length of thread, I don't like to run out in the middle of something and have learned to sew with very long pieces. If you are like me, and half of your stitches will be longer than normal, cut your thread 8 times the distance!
STEP 8 - Add a Ribbon Hanger
• Snip a "V" out of both ends of the two ribbon pieces
• Position one end of each ribbon piece at the top of the door pocket as shown. (The other end is loose above.) Mine slants inward slightly to show my top-most stitches and the bottom outside edge is even with pocket edge.
• Sew a button on top of each ribbon piece. Start on the front, insert your needle and thread all the way to the back and come up through the second button hole. Tie a square knot to secure the button. Snip your thread. Repeat if you have four holes in your button.
• Tie the top of your ribbon pieces into a loose (but secure) square knot.
And - ta da! It's lovely!
Fill with dried flowers or fresh bunches of baby's breath from your local florist or grocery. I wrap a little bit of batting or muslin fabric around the bottom of my flowers before tucking them inside.
Did you enjoy this tutorial? Have any questions about the process? Please feel free to comment below and/or share this post with your friends who sew. I'd love to see photos of your "pockets" and with your permission, post them here or on Oliver Rabbit's Facebook Page. You can email them to me: oliverrabbitny(at)gmail.com
Happy (almost) Spring!
Annette
