
How to Make A Felt Easter Tree
/
This pretty felt tree can be made in any colors to accent your decor. At five inches tall, it looks great as a small centerpiece or alongside your favorite little stuffed animal. I created the one below for a blue polar bear during the winter holidays. (The pink bunny is not included in this tutorial but you can get one in my shop.)

Easter's on its way! Let's make a tree to celebrate spring! I chose pastels in green, dune, pink and soft white for this tutorial . . .

TOOLS YOU WILL NEED
• Rotary cutter, ruler and mat for easily cutting your felt strips and squares. (You can also mark and cut your felt with scissors.)
• Embroidery needle and floss (about 14") in a coordinating color for attaching the pom and last square at the top.
• One-quarter inch hole punch to put holes in your felt squares.
• Hot glue gun to stabilize your tree trunk (if needed) and to secure the top of your tree.
• Scissors, ruler and a pencil.
MATERIALS YOU WILL NEED
• Four, 5 1/4" x 10" pieces of felt in different colors - choose those you love.
• One tree base with a hole in the middle. I used a 2" x 5/8" round wooden disk with a 3/8" hole. Any flat wood slab in a similar size will be fine.
• One 3/8" x 5" dowel or straight stick for the trunk. You will be punching holes in squares of felt and sliding them down the trunk. I do not recommend a diameter any larger than 3/8". My stick is actually about 1/4" in diameter. (More on this to follow.)
• One little pom in a coordinating color for the top. I used a needle-felted ball.
My strips shown below are ready to be cut into squares. (RE: Step 2) And you'll see at the end I decided on a white pom instead of green!

STEP 1 - PREPARE THE TREE TRUNK
I painted my tree base chocolate brown. This is optional depending on what you use. The trunk itself will not be visible when your tree is finished. If you have a dowel (or stick) the exact size of the hole in your base, join them together and you're all set to move on. I used a stick narrower than the 3/8" hole in my base, about 1/4" in diameter. In order for my trunk to stay in place, I lined the edges of the opening with a little bit of hot glue and held my stick straight until the glue hardened. I use a glue gun about once every five years so it took a few tries! You want your trunk to be vertically straight - like getting a Christmas tree in the stand upright! My stick goes all the way in so it is 5" from the bottom of the base to the top of my trunk. This measurement is important to note because these directions are calculated for this height.
***For example, if you use a taller trunk (and then perhaps a wider base for stability), you will need to add to the number of squares I have called for bellow and may want to make them larger in scale.

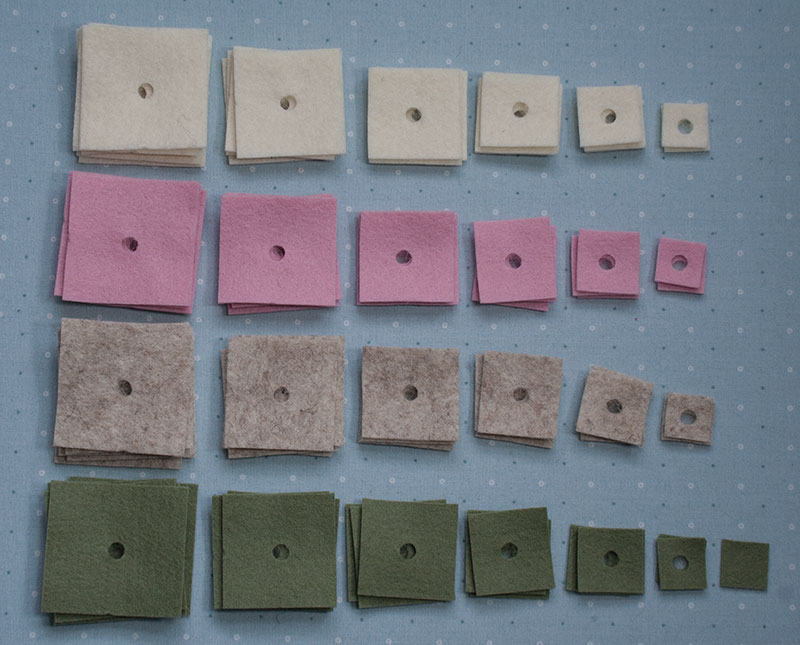
STEP 2 - FELT STRIPS & SQUARES
This little tree is made with 81 squares of felt - 20 in each color plus one for the very top. First we cut the felt into strips and then those strips into squares. For each of your four colors, cut one strip in all the dimensions listed below. You will have six different-sized strips for each color. Then cut your strips into squares that measure the width of your strip; your 2" x 10" strip will become five, 2" squares and so forth. I've noted how many squares each strip will yield in parentheses. Keep your squares together by size and color as you cut them.
2" x 10" (5 squares)
1 3/4" x 7" (4 squares)
1 1/2" x 4 1/2" (3 squares)
1 1/4" x 3 3/4" (3 squares)
1" x 3" (3 squares)
3/4" x 1 1/2" *** (2 squares except color "a" will have 3, see ***)
*** Determine how you want your colors to repeat vertically. I chose green to be my bottom color (a), then dune (b), pink (c) and soft white (d). For color "a" you want to cut this last strip 3/4" x 2 1/4" because you need an extra 3/4" square in this color for the top!
STEP 3 - PUNCH THE HOLES
You are now going to punch a hole in the center of each square EXCEPT the extra one in color "a". Don't punch a hole in this one! My hole punch does not reach the center of a 2" or 1 3/4" square without the felt bunching. I want my hole to be as close to the center as possible and once the felt has bunched, it's more difficult to "eye" this spot. So, for all of my 2" and 1 3/4" squares, I put a tiny pencil dot in the center. I did not measure for this, just "eye-balled" it - that will be good enough.
My hole punch is also ancient - my poor hole punch! It does not cut a clean hole into the felt square. It's okay if your's doesn't either; just pull the little circles out.

As you cut the holes in your squares, arrange them for assembly . . .
STEP 5 - STACK YOUR TREE - YAY, THE FUN PART!
You are going to stack your squares from large to small. The felt will stretch easily over your trunk if it's a bit wider than the holes. Begin with color "a" (in my case, green) and slide a 2" square down over your trunk so it lays on top of the base. Then add 2" squares of colors b, c and d. Repeat this process until all of your 2" squares are on. Continue with the 1 3/4" squares, then the 1 1/2" and so forth until you get to the top of your trunk. DO NOT put the last 3/4" square with a hole on the trunk. You are going to attach it to the one without a hole in STEP 6.
Below is a "bird's eye" diagram of how to position your squares to achieve a mixed color effect. The points of my b, c and d (dune, pink and soft white) colors extend along each side of my first green square. Then, as you see in the second diagram, when I begin again with green, it is not in the same position as the first green. This square is actually at a right angle to the first, with its points in between the dune and pink.

You really just have to play with them a bit as you stack your tree, keeping the points of your squares in between those below. Here is how your tree will look about half way up:
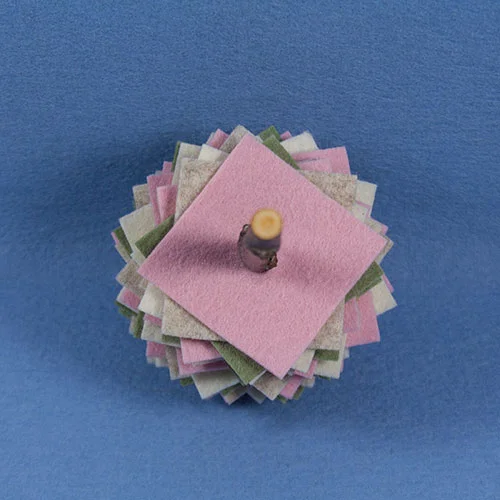
And here it is at the top:

STEP 6 - ASSEMB:E THE TOP PIECE
Thread your needle with two strands of embroidery floss knotted at one end. Come up into the middle of your 3/4" square without the hole in it. Pull your thread all the way through. Send your needle into the middle of your pom and back down again; re-enter your felt square right next to where you came up. Pull your thread so the pom is tight against the felt. Knot your thread on the back but don't snip it yet. Grab the last 3/4" square that you haven't put on the tree trunk and send your needle through its hole. Bring the two felt squares close together at right angles to each other. You now want to tack them together at the four points of the square with the pom on it, grabbing the square with the hole in it as you stitch. After you have tacked all four points, knot and snip your thread on the back.

STEP 7 - FINISH
Get your glue gun again! Put a dab of hot glue on the top of your tree trunk. Place the pom assembly on top and give a little downward pull on the square with the hole in it, bringing it over the trunk. Push down on the top of the pom while the glue hardens. And . . . Ta Da! You're finished :)

Find a favorite little animal, some jellybeans and show off your work . . .
I had fun - hope you did, too!
