
How to Whip Stitch Felt Edges
/
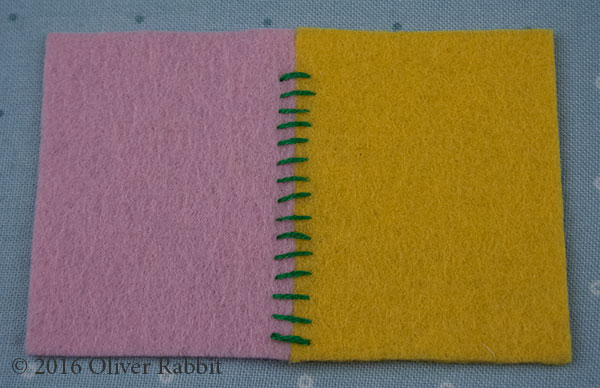
The whip stitch is a simple hand-sewing method often used to sew two pieces of felt together. It is popular for making softies because the edges meet each other when the sewn seam is "opened" and the joined pieces of felt spread apart as one sheet. Additionally, whip stitches are tiny and "melt" into the fabric, producing nicely curved shapes when a softie is firmly stuffed.

***In this tutorial I reference approximately 1/8" as the distance from the outside edge of the felt to your stitch "poke" as well as how far apart they are from each other. This is a good size to learn with and in some projects will be just fine. If you are stitching around a softie that will be stuffed, however, you want your stitches to be 1/16" from the edge and each other. Smaller stitches will create a smoother definition in your rounded curves when the seams are expanded and allow you to stuff firmly without poking through your seam.

We are going to stitch across the straight edges of two pieces of felt, joining them together. We will start and end with a strong double stitch to ensure our seam is secure. Then I will show you how to meet up and knot off your thread for a closed shape edge.
You will need the following:
• Two pieces of felt with a straight edge, like a rectangle or square and/or two pieces of felt in any matching shape that you want to stitch all the way around and close up. I recommend wool or wool blend felt, even for practice.
• Embroidery floss.
• Embroidery needle, size 7 or 8. Size 7 is larger than 8. I know! Silly, but that's how it is. A larger needle may be easier for you to work with if you are a true beginner.
• Scissors and a pin or two.
Here are some general notes to keep in mind as you work:
• When sewing a felt softie together, your stitches are visible from both sides of your seam. It is important that you keep the outer edges of your felt pieces even as you work. This will encourage uniformity in your stitch size on the front and the back.
• It is somewhat difficult to keep stitches straight and evenly spaced with the whip stitch because your needle travels at an angle in between the two layers. Embrace the hand-made character of this stitch!
• Felt has a tendency to "shift" or "creep" when sewn with the whip stitch, again, due to the angle of your stitching. Pay close attention or your pieces may be uneven at the end of your work.
• When sewing the whip stitch, do not pull your thread too tightly around the edges of your felt. You just want it to sit against the surface but not indent or distort the edges. If you stitch too tightly, your felt will pucker rather than lay flat where the two pieces meet when the seam is opened. Puckering also occurs when your stitches are not uniformly the same distance from the edge on both sides.
• For stitching, thread your needle with two strands of embroidery floss knotted together at one end. Your thread length should be approximately three times the distance your are stitching.
• I work front to back, (sometimes called 'top to bottom') and in this tutorial, pink to yellow! This means that my stitches enter the front (pink) and exit through the back (yellow) as I join my shapes together. I stitch from right to left with the stitching edge of my work away from me. When using the whip stitch, I usually match my thread color to the felt. For this tutorial I have used a contrast thread to enable better visibility in my photographs.
Let's Get Started!
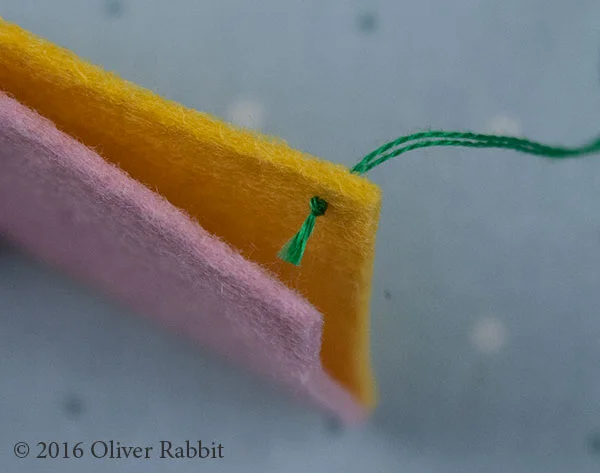
Cut out your shapes, align the edges, pin the pieces together (if need be), thread your needle and knot the end!
Poke your needle from the inside out through the top right corner of your back piece of felt (yellow) 1/8" from the outer edge. Pull your thread all the way through so your knot is tucked in between the two pieces of felt.
Bring your needle around from the back and poke it into the front from the outside. This poke should line up exactly with the one you made in the back when securing your knot. Send your needle straight through the original poke-hole and exit on the outside of the back.

Pull your thread all the way through and voila! Your first stitch.

This first stitch will become a strong "double stitch."
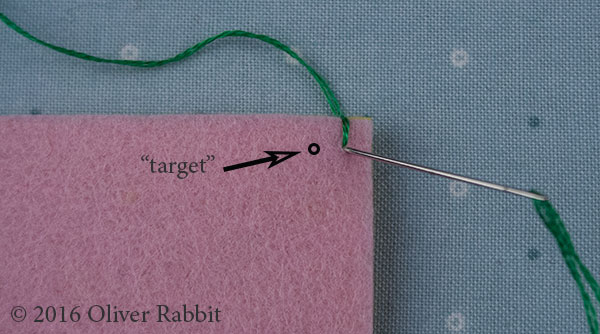
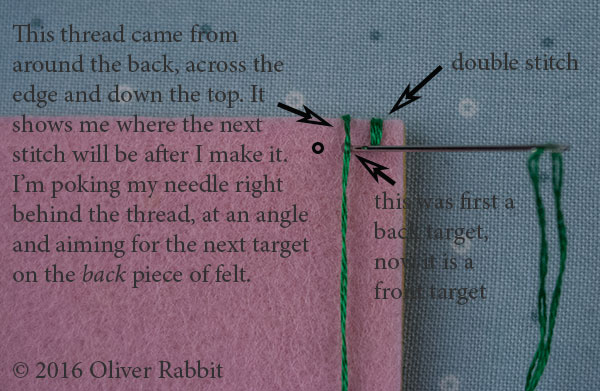
Bring your needle to the front and poke into the same hole you just created. Do not go straight toward the back! This time, you are going to enter at an ANGLE and use an imaginary "target" for your exit point on the back. This target is the same distance from the outer edge as your first stitch (1/8") and about the same distance to the left.
I want you to imagine that the little target circle pictured below goes all the way through to your back felt. Angle your needle toward it as you enter the front and exit where you imagine it to be on the back.
Here is a "bird's eye" view of the outer edge. My needle is angled and I have just emerged through the "target" on the back. The thread you see will be coming around to wrap over my first stitch to make it a "double stitch."
Here is the back. My angled needle is exiting the back "target."

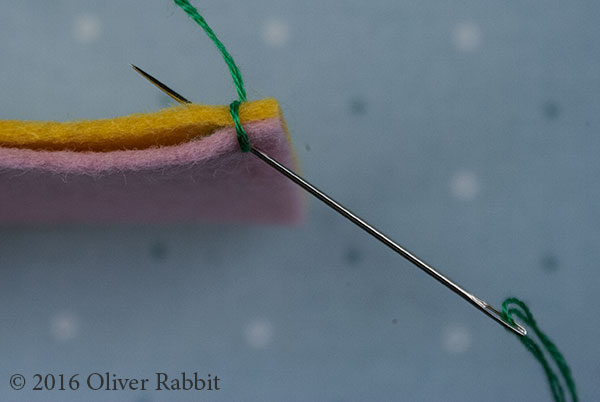
Pull your needle through and bring it around to the the front. Your double stitch is now complete.
The target you first used to exit the back is now the "enter" target for your next stitch. (I've drawn another one to use as the next back target.) Send your needle through the front at an angle and exit through the back at your next imaginary target.
You don't actually have to lay your thread down like I've shown/described in the photo below. I just wanted you to see what's happening. Every stitch should lie perpendicular to the outside edge.
Here is what the edge looks like at this point.

The front after your stitch is complete . . .

And the back . . .

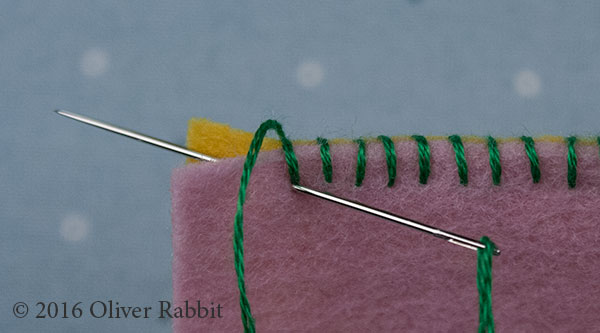
Bring your thread back around to the front and continue stitching across your edge.

Finishing
The position of your last stitch at the end of a seam is defined by the angular exit point on the back. In the photo below, my thread has just come out the back target from an angular insertion on the front.
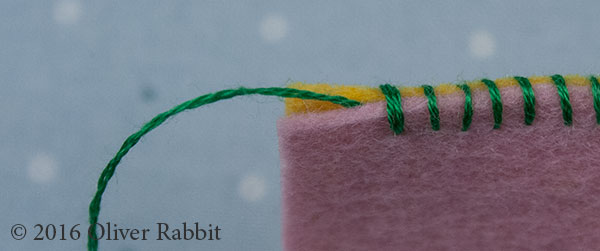
I don't want any stitching beyond where that thread has exited. Bring your needle to the front and poke straight through to the hole your thread just came out of in the back.

Pull your thread all the way through and bring it to the front. Poke the same hole again but exit in between the two pieces of felt.
My last stitch is now a strong double stitch and my thread is inside.
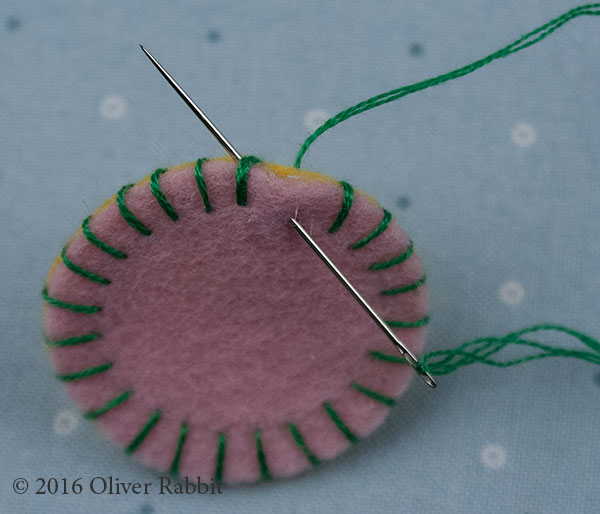
Open up your seam to the inside. You can see your thread coming through to the inside below (on the left). Send your needle up under the inside loop of your last stitch.
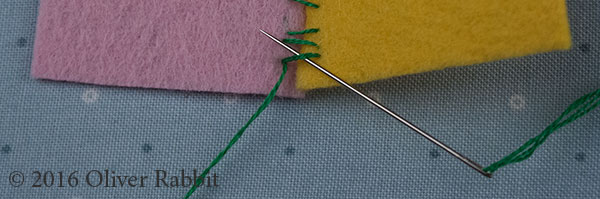
Wrap your thread around your needle two times. Hold this section of your work with your thumb and index finger - your thumb on the inside against the coils around your needle and your index finger on the outside. Pull your needle and thread all the way through, making a knot against the stitch

Enter right next to your knot and send your needle through the middle of your felt for a half inch or so, careful that it cannot be seen on the outside. Snip your thread close to where you exit.

Open up your work and admire it!
You can see in the photo below, at the top where there are no stitches and for the first few stitches, the felt edges lie flat against each other. This is also true for my last few stitches. Notice, though, in the center they are pushed against each other a bit, with a pucker. This is what will occur when you pull your stitch too tight.
How to End when Closing a Shape
When you are stitching all the way around a shape and need to join the end to the beginning, as with a felt softie, here is what you do:
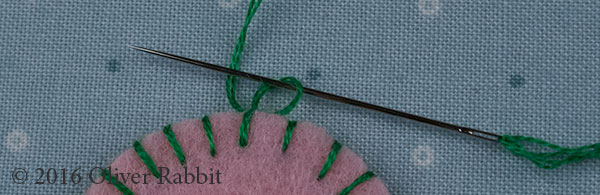
Begin stitching as described above, with a double stitch and sew all around your shape. When you approach your starting point, take your last stitch at an angle as you normally would but instead of exiting on the back through a target, exit through the middle of your two felt pieces on the other side of your initial double stitch. You are going to knot off around this stitch.
After you exit all the way through, bring your needle around and send it up under the outside edge of this double stitch.

Pull your thread through until there is a little loop next to the edge. Send your needle through the loop and pull tightly to make a knot right at the outside edge. Press your fingers around the double stitch so those threads are not distorted when you pull.
You now have a tiny knot on the outside edge of your first double stitch. Send your needle in between your felt pieces, right next to your knot, and exit in the middle of your work an inch or two away.

Pull your thread all the way through and give a gentle pull, tucking your knot inside along the edge and snip your thread where it exited.


Hope you had fun!
Annette
