
Primitive Felt Cat Ornament - A Free Pattern for Handmade Holidays
/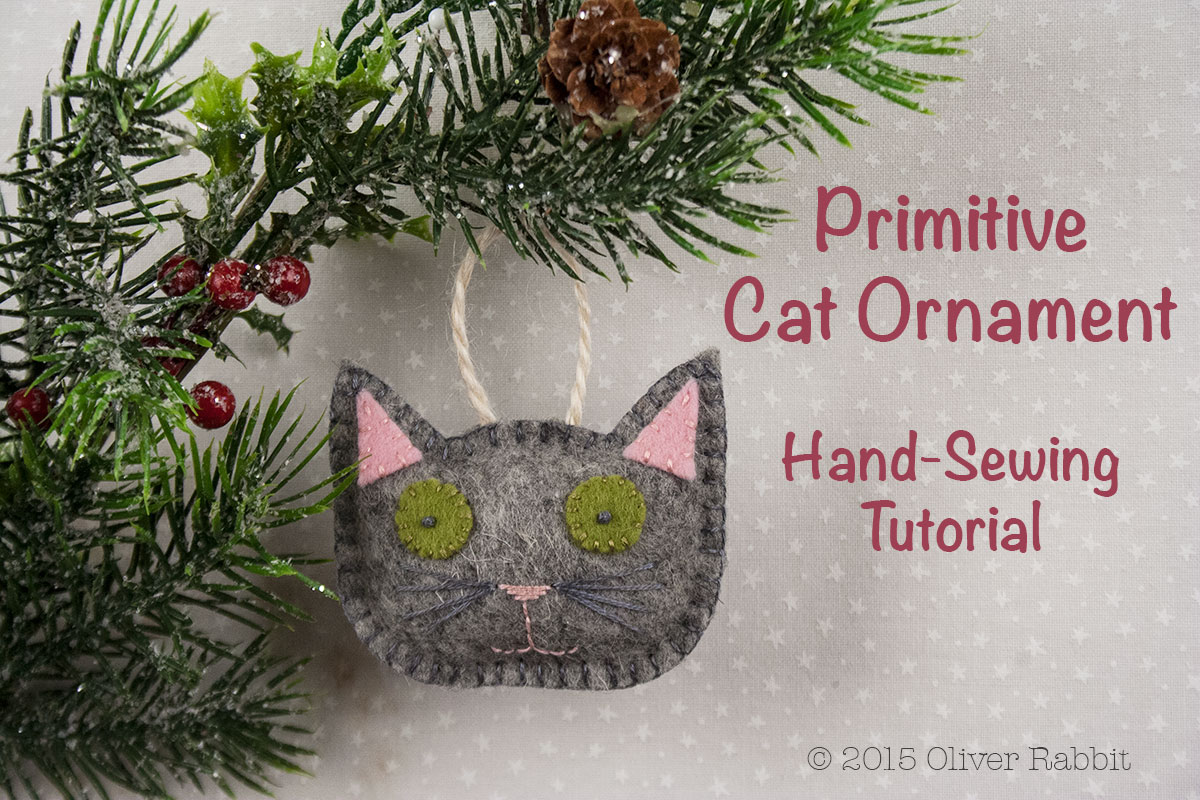
It's coming on that time of year when baking cookies, festive decorating and sewing hand-made gifts are at the forefront of my thoughts. This primitive cat tutorial is my hand-made gift to you! Perfect for all skill levels, another opportunity to use those scraps and certain to bring a smile. Dec' the tree or top a package - simply adorable :)
If you're new to working with felt or need a refresher, have a look at my Wool Felt Lesson Series for some great tips. I also wrote about the Advantages of Using Pure Wool Felt for Softies for the SewMamaSew blog earlier this year.
My Sample
For my little kitten, I used 1mm Holland Wool Felt in ash from A Child's Dream Come True for the face and scraps of baby pink, laurel and cranberry for accents. My cotton floss colors correspond with the felt pieces. I used a size 7 needle threaded with two strands of floss knotted at one end. Cut your thread approximately 4 times the distance you are sewing. My cat is stuffed with wool roving. Choose any colors you like. Make it your own - and email me a picture; I'd love to see what you create!
What You Need
• Pattern - download it here
• Wool felt - 3" x 5" for the face; scraps for the eyes, ears and back heart
• Coordinating Embroidery Floss
• Jute Twine or Ribbon - 6" piece
• Stuffing and a Narrow Stuffing Tool (like a chop stick)
• Freezer Paper - 3" x 6" (to use the Freezer Paper Method for cutting your felt pieces)
• Tools: iron, sharp scissors, embroidery needle (size 7 or 8), a pin or two and a pencil
Stitches Used: straight stitch, whip stitch, blanket stitch, French knot
Step 1 - Cut Everything Out
Using the Freezer Paper Method, trace, iron and cut out all of your felt pieces. You will have two faces (one is actually the back), two ears, two eyes and one heart. Remove the paper from your felt.
Step 2 - Let's Start With The Back!
Place the heart on the back piece as shown and whip stitch all around. Knot and snip your thread on the inside. I actually love this side of the ornament!

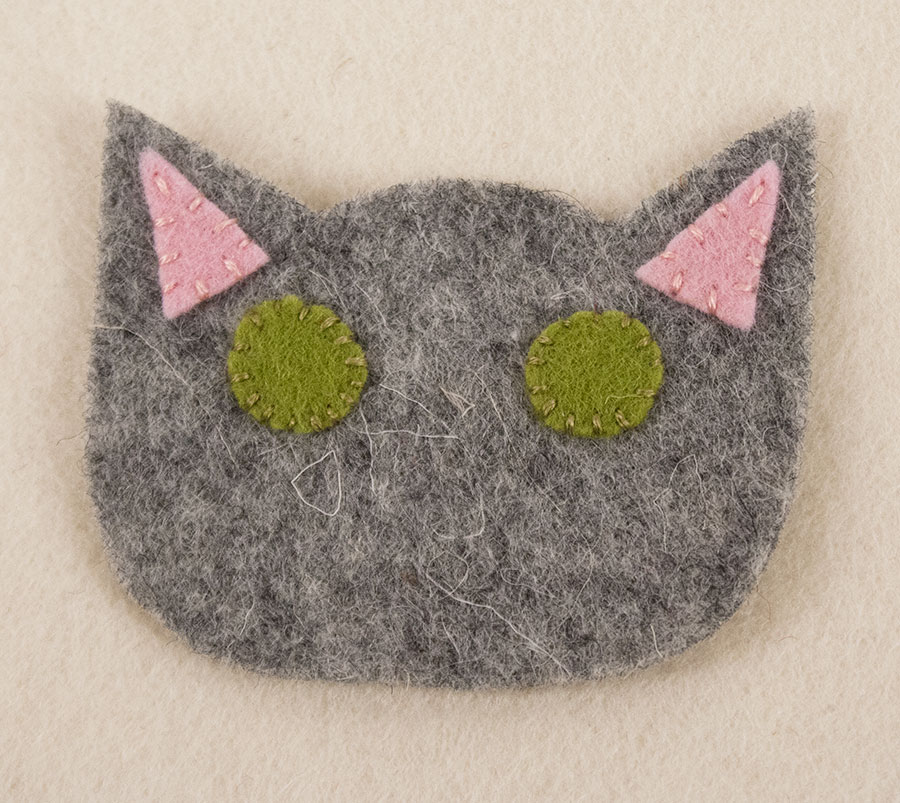
Step 2 - Secure the Eyes and Ears
On the face FRONT piece, position your triangles within the ear points as shown below. Keep in mind you are going to be stitching the perimeter so be sure to leave room for this stitching, 1/8" - 3/16" along the edge. Whip stitch the ears in place. Knot and snip your thread.
Next, lay the eyes on the face. Mine are 1/8" from the bottom edge of the ear with just over 1/2" between them. Whip stitch around the eyes; knot, secure and snip your thread on the back.
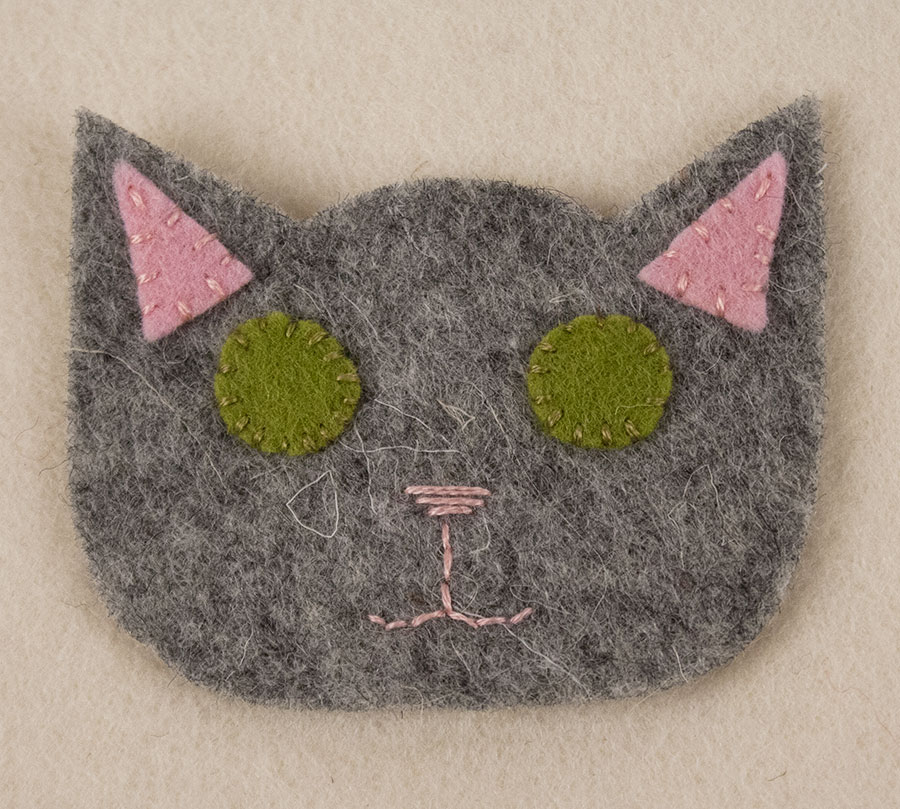
Step 3 - Nose and Mouth
For the nose, begin about 1" down from the top of the face curve and take three or four straight stitches, centered left to right, narrowing each as you go to form a "v" shape.
Next, take three small vertical straight (or back) stitches just below the nose. For the little mouth curve on each side, the first stitch slants slightly downward, the middle stitch is horizontal and the outside stitch slants slightly upward toward the outside of the face.
Step 4 - Whiskers and Eye Centers
To make the whiskers, take four long straight stitches on each side of the nose. Bring your needle up on the outside edge just beyond the eye to begin and finish each stitch by entering the stitch hole on the side of your top nose stitch. Re-enter this point for each stitch. See photo below.
TIP - These long stitches are a 7 on the "snag factor" scale. I knot my thread between each stitch and at least recommend knotting before you start the second side. Then, over the years, if one whisker gets pulled, the rest remain in tact :)
On the eyes, make a French knot in the center. I used my whisker-color thread - two strands of floss with four wraps around my needle. Make sure they are secure and knot the back for each one.

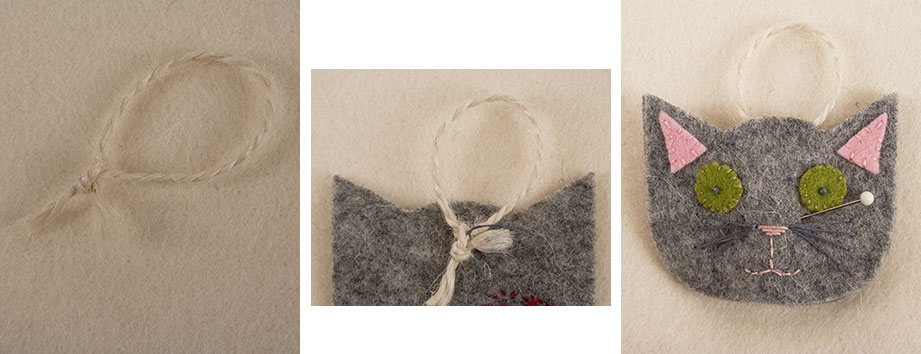
Step 5 - The Hanger You Don't Want To Forget!!!
I'm not going to tell you how many times I have stitched around ornaments, reached my stopping point for stuffing and realized I forgot to insert the hanger. I will tell you what I do now so I don't forget.
Take your twine (or ribbon) and tie a square knot with the ends to form a loop. Place the hanger on the INSIDE of the face BACK and tack it with a couple of stitches. Be sure not to let these stitches show on the outside. My knot is about 1/2" below the top edge.
Then lay the top face over the back and pin together. Match up all of your edges and ****make sure your heart is on the outside of the back!!!
Step 6 - Stitch Around
TIP - I have learned that my ornaments have a nicer finish when I begin and stuff from the bottom, as opposed to the top where the hanger is. I used to start at the top and add my hanger loop when stuffing and finishing. I forgot fewer hangers this way but it was always a messy process.
Begin at the bottom about 1/2" from the vertical center and blanket stitch around your cat 1/8" - 3/16" from the edge. Keep your front and back aligned as you go and your stitches will be uniform and just as pretty on the back.
GOING ACROSS THE TOP
When you are stitching across the top curve (where the hanger is), position each side of your loop equidistance from the center and STITCH THROUGH the twine or ribbon when you come up through your blanket stitch framing thread. See below.

And there you have a lovely stitch securing your hanger!
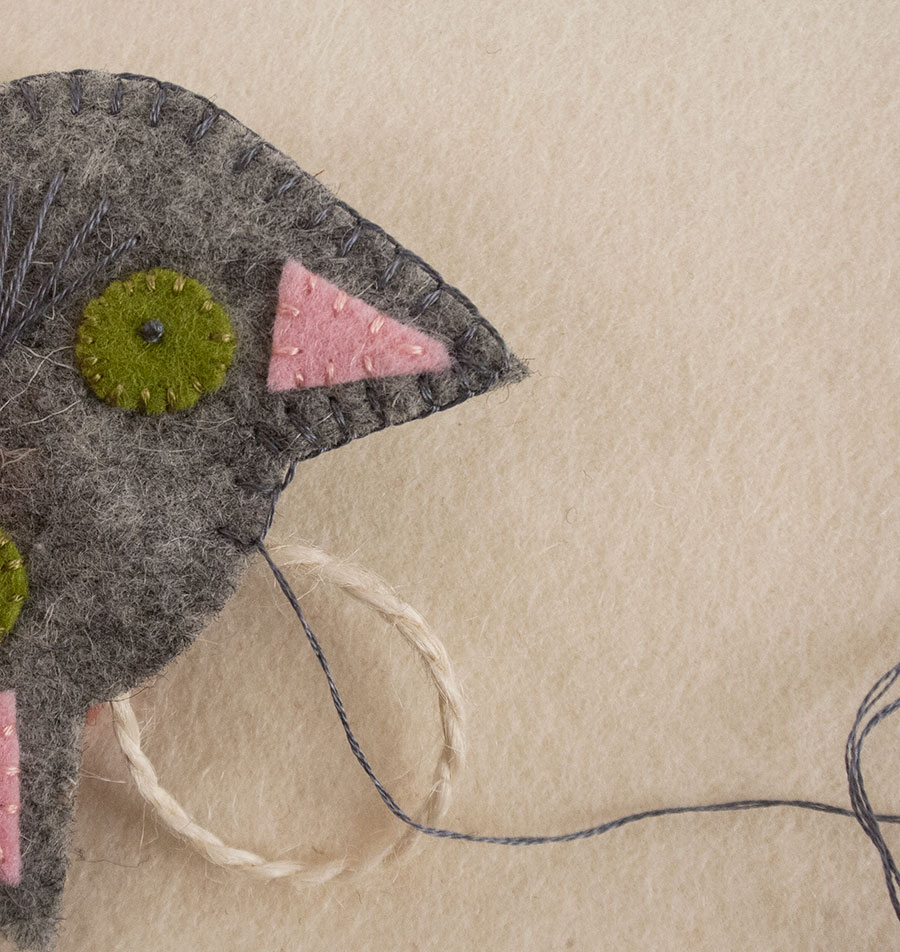
The few stitches between the loop can be a bit tricky. Just pretend the loop isn't there and stitch across the curve, catching the second side of your twine the same way you did the first. Keep going until you get about an inch or so away from where you started. Don't snip your thread yet! You will use it to close up.
Yay! - Almost done.

Step 7 - Stuff and Close
Gently stuff your cat. Begin with little bits for the ears and work your way toward the opening. When you push stuffing into the center, try to position it on top of the knot that is tacked to the back so you have a smooth face on the front.
Close up your opening. You will join your last stitch to the first and make a tiny knot at the edge. Insert your needle in between the front and back pieces of felt right where you make this knot. Emerge somewhere on the face, pull your thread all the way through and give a gentle pull, tucking your knot inside along the edge. Snip your thread close to the felt.

Give your stuffing a little smoosh-a-bout so it's even and . . . ta da!
You're just going to have to make more since you can't part with this one :)

Happy Merry-Making,
Annette
