
Treats for You . . . Free Halloween Ornament Patterns!
/
The leaves are falling, the crows are calling! Time to stitch some Halloween spookiness!
Make this ghoulish trio as individual ornaments or suspend them together to hang on a door. A great beginner project!
WHAT YOU NEED
• Wool Felt (I recommend wool or wool blend felt for best results.)
Black 4" x 5" (Cat face, Jack-O-Lantern features, Frankenstein hair)
Green 3" x 6" (Frankenstein face, Cat eyes, Jack-O-Lantern stem)
Orange 4 1/2" x 3" (Jack-O-Lantern face, Cat mouth)
Purple 3 1/2" x 1" (Frankenstein neck bar and eyes)
Grey 3/4" x 5/8" (Cat ears)
• Embroidery Floss - Coordinating or accent colors as desired
• Jute Twine - 27" for Trio; 18" for individual ornaments
• Stuffing - A small handful for each ornament
• Tools - sharp scissors, embroidery needle (size 7 or 8), a few pins, stuffing tool,
iron (for the Freezer Paper method of cutting out your felt pieces)
• Freezer Paper - 8 1/2" x 6 1/2"
• Pattern - Download and print the one-page PDF here.
Please read through all of the instructions before you begin. If you have any questions along the way, don't hesitate to reach out; I'm happy to help.
STEP 1 - CUT EVERYTHING OUT
Using the free pattern template, trace, iron and cut out all of your ornament felt pieces. I recommend using the Freezer Paper method for cutting out your felt.
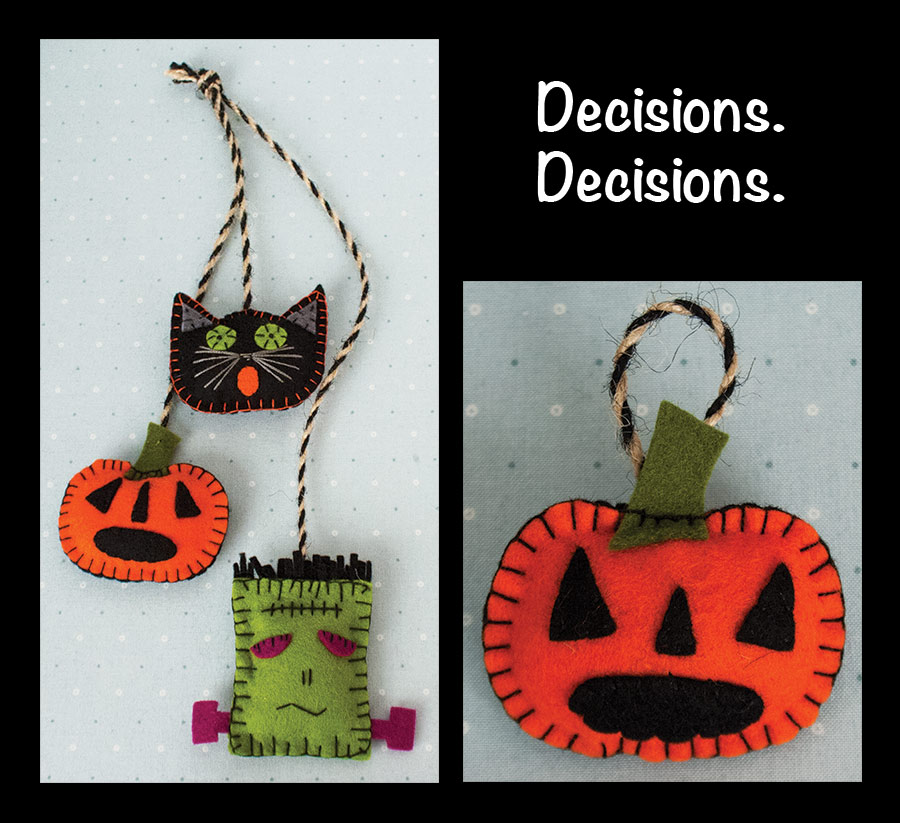
STEP 2 - DECISIONS, DECISIONS!
Make individual ornaments or hang them as a Spooky Trio tied together at the top with a knot.
You decide!!!
STEP 3 - LOOP HANGERS
If you want individual ornaments, cut three lengths of twine 6" long. If you want to make a Spooky Trio, cut your jute twine into three different lengths: 11", 9" and 7".
• For individual ornaments, tie the ends of your hanger together with a secure square knot. Position the hanger on the inside of the ornament back, centered left to right with the knot 1/4" below the top. Tack in place from the inside. Be careful not to stitch through to the outside.
• For the hanging trio, tack one end of your length of twine to the inside of the ornament back.
STEP 4 - SPOOKY CAT
• Using the placement diagram and photo below as your guides, position and applique the ears, eyes and mouth to the ornament front. I chose a contrast color (black) and used large whip stitches around the ears and eyes, finishing the eyes with a French knot in the center. My cat's mouth is appliqued in coordinating floss with normal whip stitching.
• For the nose and whiskers, take three horizontal stitches just above the mouth, one slightly wider than the next, forming a "v" shape. Then take a series of long straight stitches (5/8" - 3/4") on either side of the nose, fanning them apart, to make the whiskers.
• Lay the ornament front over the back with the embellished side out and the hanger on the inside of the back. Make sure your felt edges are even all the way around and pin together. Begin along the bottom edge 1/2" from the center and blanket stitch all the way around. I used orange thread for a contrast frame to pick up the mouth color. Stop stitching 1" away from where you began to leave an opening for stuffing. Leave your needle and thread attached; you will use them to close up.
• Stuff your cat and close up the opening. Knot your thread where you join your last stitch to the first. Send your needle in between the front and back right where you make this knot. Exit within the ornament and pull snugly, tucking the knot inside along the ornament's edge. Snip your thread close to the felt.

STEP 5 - FRANKENSTEIN :)
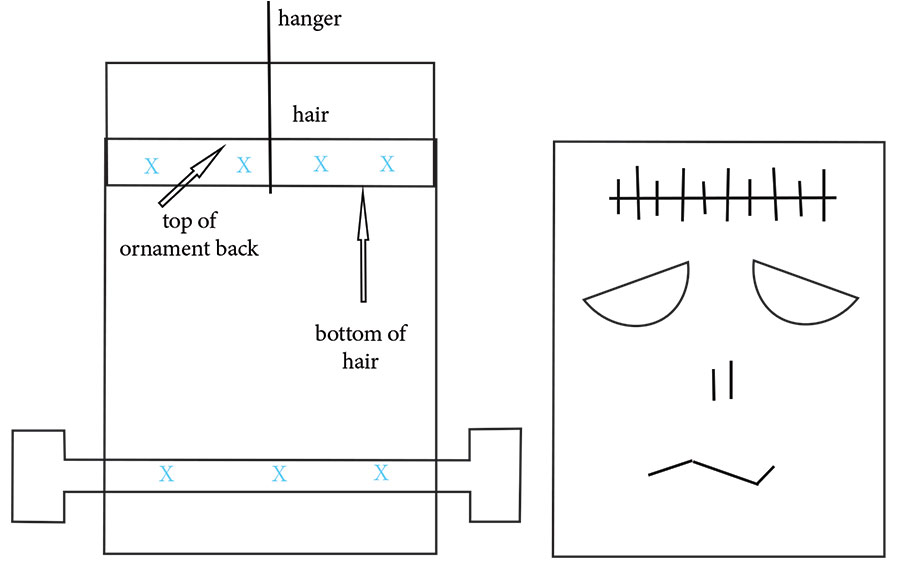
• Use the diagrams and photo below to make "Frank." Begin with the ornament back and lay the hair piece across the top, overlapping the hanger and about 1/4" of the top. The hair piece will set just inside the face on the sides. Tack in place at the Xes; make sure your stitching does not go through to the outside back.
• Lay Frank's neck bar across the bottom of the ornament back (on the inside) approximately 1/4" from the bottom. Tack in place at the Xes.
• Position Frank's eyes on the ornament front as shown and whip stitch in place. I used contrast thread and random size stitches just across the top of each eye.
• To make the forehead scar, take one long straight stitch (1 1/8" long) across the face above the eyes. Then take a series of random length stitches across this long stitch.
• For the facial features, I took two vertical stitches below the eyes, centered left to right for the nose and then 3 random-width zig-zag stitches for the mouth, with the center one being the longest.
• Lay Frank's appliqued front on top of the back, insides together. Align your felt edges and pin to hold in place. Begin along the bottom as you did for the cat and blanket stitch all the way around Frank. I used contrast thread and alternated my stitch size for a freaky look! You will stitch through the hair extension along the top edge. Don't forget to leave an opening for stuffing at the bottom and keep your needle and thread attached for closing up.
• Before you stuff him, Frank needs a hair cut! Make several random-width snips across the long edge of his "hair." Cut close to the edge but BE SURE NOT TO SNIP YOUR STITCHING. Then, cut every third one or so just a bit shorter than the others.
• Stuff little Frank and close him up. He can keep Spooky Cat company while you "carve" a Jack-O-Lantern . . .

STEP 6 - "CARVE" A JACK-O-LANTERN
*****IMPORTANT NOTE: The Jack-O-Lantern pumpkin pattern is not perfectly symmetrical. After you cut out both pieces, match them up and lay one on top of the other to determine the inside and outside for the front and back. (The front is on top; the back on the bottom.)
• With the diagram and photo below as your guides, position Jack's mouth, nose and eyes on the ornament front as shown. Whip stitch all around each piece, joining it to the face.
• Place the stem on top of the front so that it overlaps the curved pumpkin top about 1/4" Tack the stem in place from the inside; be careful your stitches don't show on the front.
• Lay Jack's front on top of the back, insides together. Check that your felt edges are even and pin in place.
• Blanket stitch all around Jack as you did with Spooky Cat and Frankenstein. When you reach the stem, stitch right across and through it. Leave an opening for stuffing.
• Stuff Jack fat and close him up.

STEP 7 - TRIO KNOT
• If you made individual ornaments, you are done! Yay.
• For the hanging trio, lay your ornaments on a flat surface and position them one below the other with their jute twine hangers extending toward the top. The ornament with the longest length of twine will be at the bottom; the one with the shortest length will be at the top. You get the idea. Grab all three hangers at the top and hold up the ornaments to make sure they hang they way you want them. Tie a knot at the top to secure all three lengths of twine; snip the ends as necessary and . . . .
Ta-Da! Enjoy!
Annette
